So, you’re thinking about buying a used truck camper to save money. Going this route certainly has merit. A five-year-old truck camper that went for $23,000 new can be bought for perhaps half that price used. Not only that, but there’s usually no sales tax if you buy from a private seller. Buying a pre-owned truck camper, however, can be risky. Unless you’re buying from a dealership that offers a 30-day warranty, there’s no safety net. You’re buying the camper “as is,” which means you’ll own any pre-existing issues with the camper. We’ve bought and restored several used RVs over the years, mostly Airstream travel trailers, so we know the pitfalls and rewards associated with going this route. The purpose of this article is to not only provide not only 12 essential tips for buying a used truck camper, but to also minimize risk to you and your wallet.
1. Choose the Camper
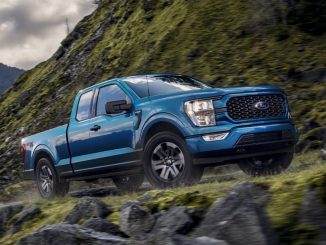
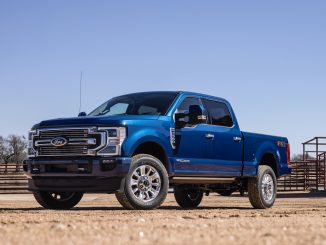
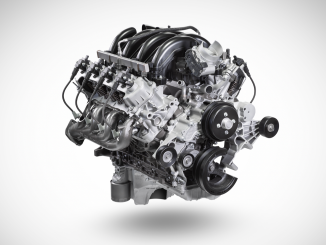
Choose a truck camper model or floor plan that appeals to you. Narrowing the list to one or two campers will save you time, reduce frustration, and help focus your search. If you already own a pickup truck, make sure you choose a camper that is under your truck’s payload rating. This is important. The standard rule of thumb is to add 500 pounds to the dry weight of the camper if it’s a pop-up or 1,000 pounds to the dry weight if it’s a hard-side truck camper. You can usually find the camper’s dry weight on a sticker on the back of the camper or in the interior of the camper inside a cabinet door. You’ll also want to keep in mind the size and dimensions of the camper to ensure it will fit in the bed of your pickup truck. This basically means matching short-bed campers with short-bed pickup trucks and long-bed campers with long-bed pickup trucks.

2. Determine Fair Market Value
After choosing a camper make and model, you’ll want to determine its fair market value. It’s important to know this figure so that you can intelligently negotiate a fair price that is beneficial for both you and the seller. Unfortunately, the resources that are out there to determine the fair market value for truck campers aren’t as plentiful as they are for other RVs like motorhomes and fifth wheels. NADA is the quickest and easiest way to determine price, but NADA has limitations in that the list prices aren’t derived from actual sales figures. If you decide to use NADA as your guide, and you’re a buyer, it’s recommended that you use either the “Low Retail” or “Used Wholesale” figure to determine your target price. If you’re interested in what truck campers are actually selling for, eBay is probably the best resource. You may not find an exact match to the model of camper that you want, but you should be able to determine a good “ballpark” figure.

3. Know Where to Look
Where are the best places to look for a used truck camper? There are several. These include the classified section at Truck Camper Adventure, dealerships that sell used campers regularly or on consignment, the classified section of your local newspaper, the RV Trader, eBay, and Craigslist. Of these, Craigslist is by far the most popular, and in my opinion, the best. It’s free, easy to use, and is accessed by millions of folks everyday (60 million per month in the US alone). I’ve bought and sold a dozen cars and RVs on Craigslist and continue to use it faithfully to this day. Sure, there are scammers on Craigslist, but the vast majority of folks who use it are honest and trustworthy. I like to use Craigslist for local searches and SearchTempest for larger expanded searches. If you’re not familiar with SearchTempest, it’s pretty neat. It searches the databases for both eBay and Craigslist and allows you conduct a search to a preset range in miles. These parameters allow you to search one or two states away from where you live or even the entire country.
4. Be Patient
As for the search for a used truck camper itself, patience is the key. When looking for something in particular it may take a month or two, or even six months to find it. Consider yourself lucky if you find your target camper locally. You may have to travel hundreds, if not thousands, of miles to inspect your camper and buy it, so brace yourself for this possibility. If your initial searches come up empty, keep looking and don’t give up. And don’t settle on something you don’t really want—keep your eye fixed on the prize. Lastly but more importantly, if you find your dream camper, contact the seller right away—don’t wait. “You snooze, you lose” applies when it comes to Internet listings like on Craigslist. Remember, other people are looking for good deals too.

If time is of the essence and inventory of your particular camper is lacking, you might have to go through a dealership. Of course, there are pros and cons going this route. While it’s true that you might be able to score on a limited 30-day warranty, it’s also true that you’ll also have to pay sales tax. For a newer model camper, this means you might be tacking on as much as an additional $2,000 in taxes. This, obviously, is a big negative, but going through a dealership ostensibly means that the camper has also been tested and cleaned. Carefully weigh all of the pros and cons before you decide to go through a dealership. Finally, know the value of the camper before you negotiate price. The dealer mark up might be as high as 40 percent, so it’s best to know the most about your camper before you start talking dollars. Don’t be afraid to negotiate on the low-end of the scale, especially if there are issues with the camper. Remember, the worst that can happen is that they say no.
5. Inspect the Camper
Now that you’ve found your target truck camper, it’s time to inspect it. If your knowledge and confidence of RVs and truck campers is lacking, you might want to take a certified RV mechanic or a friend with you who is knowledgeable about such things. Conducting a thorough inspection of the camper is critically important. It lets you know if the camper is worth the investment and lets you know if there are any issues or defects that you can leverage to negotiate a fair price. For example, a camper with a defective refrigerator can be costly to repair, especially if it needs to be replaced. The same applies to a rotted out section of the roof. As for the items to bring with you to the inspection, I recommend bringing a flashlight, a tape measure, and a multi-meter at a minimum. A PDI check list is also recommended (these can be found on the Internet). Depending upon the age and condition of the camper, you may also want to bring a 12 volt battery to test the 12 volt system in the camper. Discuss the condition of the battery with the seller ahead of time to ensure that you’re prepared.

6. Look for Leaks
When it comes to used RVs, it’s important to know that water intrusion is an RV owner’s worst nightmare. It doesn’t matter how expensive a camper is, water intrusion, if left unchecked, can rot out entire sections of a camper’s roof, walls, and flooring. The trouble is many owners don’t keep up on caulking to keep their rigs water tight and when leaks occur they’re often difficult to detect. Moreover, the amount of damage that a leak can cause increases over time, so the longer a rig sits out in the weather without any kind of maintenance the worse the damage can become. Because of this, the location where the camper has been sitting can sometimes be important. I’d much rather buy a camper that’s been sitting in the desert southwest than one that’s been sitting in an area that gets a lot of rainfall like in the Pacific Northwest or in the southeast (unless the rig has been under cover).
So what things should you specifically look for when it comes to water damage? I like to start the inspection inside. Use all of your senses when inspecting the camper. Does the inside of the camper smell dank and musty? If the answer is, yes, this usually means leaks. Closely inspect the ceiling and floor for tell-tale signs of water leaks, these include things like stains, peeling wallpaper, and bubbling laminate on the walls and cabinets. Black mold is another dead give away for a persistent leak and should give you cause to run, not walk away from the deal. Tap on the floors, especially around the edges, with your knuckles or the handle of a screw driver to ensure that the floor is firm and solid, not soft and spongy.

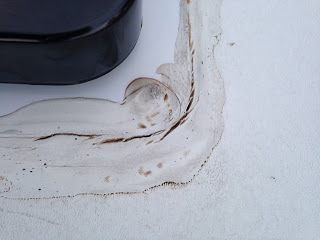 Old and cracked caulking on rooftop vents and fixtures usually indicates leaks.
7. Inspect the Roof and Body
Outside, you’ll want to get up on the roof and inspect the caulking around the fan covers, skylights, and solar panel mounts. Old and cracked caulking is a sure sign of leaks. Again, tap the roof around all openings and penetrations for evidence of water damage. A soft and spongy section of the roof is a dead give away for a leak and a costly and time-consuming repair. All penetrations on the sides of the camper should also be examined. These include things like running lights, jack mounts, and windows. For campers with fiberglass siding, closely inspect the sides of the camper for evidence of delamination. Grab and wiggle the jacks for signs of frame damage caused by wood rot. Likewise, grab each of the four tie down anchors to ensure they’re firm and rock solid. After doing this closely inspect each tie down anchor for any evidence of frame damage.
8. Inspect the Electrical System
If the camper passes your initial eye and nose test, and appears to be structurally strong, you can proceed with the rest of the inspection. I like to test the camper’s electrical systems first. With the camper plugged in to shore power (or a generator) test the air conditioner and microwave, these are high amp draw devices and will give the camper’s 110 volt electrical system a good stress test. Disconnect the 12 volt battery to test the camper’s AC to DC converter. If the converter is working properly all of the camper’s 12 volt devices like the lights, fans, and the water pump will work. At this time, you’ll want to make sure that the refrigerator and furnace and all AC and DC outlets are in proper working order.
If the 110 volt AC side checks out, move on to the 12 volt electrical system. Check the voltage of the battery (or batteries) at rest using your multi-meter. At a minimum, the voltage of the battery should be 12.4 volts. Reconnect the battery and unplug the camper from shore power. If the camper’s battery is in good shape, all of the 12 volt devices like the lights and fans should work. If the camper is equipped with either a three-way refrigerator or a DC compressor refrigerator now is the time to check it for proper 12 volt operation. Lastly, if the camper has a solar power system, check the charge controller for a proper charge (to test this you’ll need to check the camper during daylight hours, of course). Be suspicious of a seller unwilling to test any appliance for proper operation. Most of the time, this won’t be an issue, but if it is, you should walk away from the deal.

9. Inspect the Propane and Plumbing
With the camper still unplugged from shore power, its time to check the other systems. After turning on the propane, determine if there are any propane leaks by opening cabinet doors and drawers. Leaking propane leaves a pungent, rotten egg odor that’s easy to detect. If no leaks are detected, continue with the inspection. Test the cook top or stove to ensure that it works, and don’t forget to check the furnace and water heater for proper operation as well. If the camper is equipped with an absorption refrigerator, make sure it operates on the propane setting (for this test, the refrigerator will need to be turned on the night before). If all of that checks out, move on to the plumbing. Test all faucets using both the city water connection and the camper’s internal water tank and water pump. With the water running, check inside cabinets for evidence of leaking drains and pipes. Check the toilet to ensure that it flushes and doesn’t leak. If the camper has a cassette toilet, make sure that the toilet bowl fills with water when the 12 volt fill button is engaged.

10. Inspect Windows, Door, Cabinets, Etc.
With the major systems checked out, inspect the rest of the camper. Test all windows, doors, and cabinets for proper operation. Lift the mattress and inspect the cabover foundation underneath to ensure that it’s dry and sound. If the camper you’re looking at is a pop-up, closely examine the pop-up fabric or liner for rips or tears or for any signs of mold and mildew. You’ll also want to examine the window screens and zippers that cover the pop-up windows to ensure they look good and are in proper working order. Ensure that the motorized or manual hand-crank pop-up mechanism can be extended and retracted fully and doesn’t bind when it’s opened and closed.
11. Inspect Jacks, Running Lights, and Clearance
With the inside of the camper inspected, it’s time to go outside. With the camper still unplugged from shore power, test the four electric jacks for proper operation. Make sure that the jacks are able to extend and retract fully. Do the same, if the camper has slide-outs. If the camper has a generator, make sure that it starts and runs with no issues (I recommend that you run it a good 15 minutes to ensure that is functioning properly). Next, plug the camper’s six-wire umbilical cord into your truck to verify that all running lights, turn signals, and brake lights work. If there are any exterior lights, make sure each of these are tested as well. Finally, take some measurements to ensure that the cabover part of the camper will clear the cab of your truck. In general, new trucks have taller cabs which will necessitate some kind of riser or platform to provide sufficient clearance. A minimum of 3 to 4 inches of clearance is recommended.

12. Check for Rodents and Insects
I already touched upon black mold and propane leaks, which are well-known health hazards, but there’s another, lesser-known hazard to be aware of as you conduct your inspection of the camper. Field mice, though cute, are often carriers of the dreaded hantavirus. This is a particular problem out west, especially in the Four-Corners region. Tell-tale signs of a mouse infestation are mouse droppings, urine stains, and nesting material. If the camper has or had mice, you have two courses of action: either call the deal off until the infestation is removed and the camper is disinfected or do the cleanup yourself. If you elect to do the cleanup yourself, precautions are needed to avoid catching the virus. Wearing a respirator with a HEPA filter and latex or rubber gloves are a must. An important thing to remember during the cleanup is to never sweep or vacuum as this activity can kick up contaminated dust which can be inhaled. The correct course of action is to spray the urine and droppings with a disinfectant or a mixture of bleach and water, let soak for five minutes, then clean up the debris with a paper towel. After the removal of all contaminated debris, all inside and outside surfaces of the camper’s interior should then be disinfected.
Closing Thoughts
Are these really essential tips for buying a used truck camper? We think so. We’ve bought and sold several RVs including truck campers, and we have a certified PDI staff, so we know what we’re talking about. Truth be told, after we published this article back in 2016 we discovered several websites, basically using this article as a reference for their own used truck camper article without credit. That’s okay. We think you know and trust us as your go-to source for all things truck camper related. We try and do this without any bias as a service to you or our readers.